Custom nameservers help strengthen your brand identity while giving you greater control over your DNS management. This guide explains how to configure custom nameservers on Trustname and avoid common setup mistakes.
Key Takeaways
- Branding – Use branded nameservers for a professional appearance.
- Configure – Add custom nameservers and DNS A records.
- Verify – Check DNS propagation after saving changes.
- Avoid Errors – Use the correct nameserver format and IP addresses.
- Test – Confirm your nameservers resolve correctly with DNS lookup tools.
TABLE OF CONTENTS
- Key Takeaways
- Steps to Configure Custom Nameservers on Trustname
- Common Mistakes to Avoid When Setting Up Custom Nameservers
Custom nameservers enhance your brand by displaying your own domain name instead of your hosting provider's nameservers.
They also make domain management easier because if you change hosting providers in the future, you won't need to update the nameservers for every client domain.
At Trustname, you can easily configure custom nameservers through your customer portal. Follow the steps below to get started.
Steps To Configure Custom Nameservers On Trustname
- Log In To Your Customer Portal
Visit Trustname.com and click Log In.
Enter your email address and password to access your account.
- Navigate To Your Domains
From the Domains menu, select Registered Domains.
You'll see a list of all the domains registered under your account.
- Select The Domain
Click the Domain you want to configure.
Be sure to click directly on the Domain name.

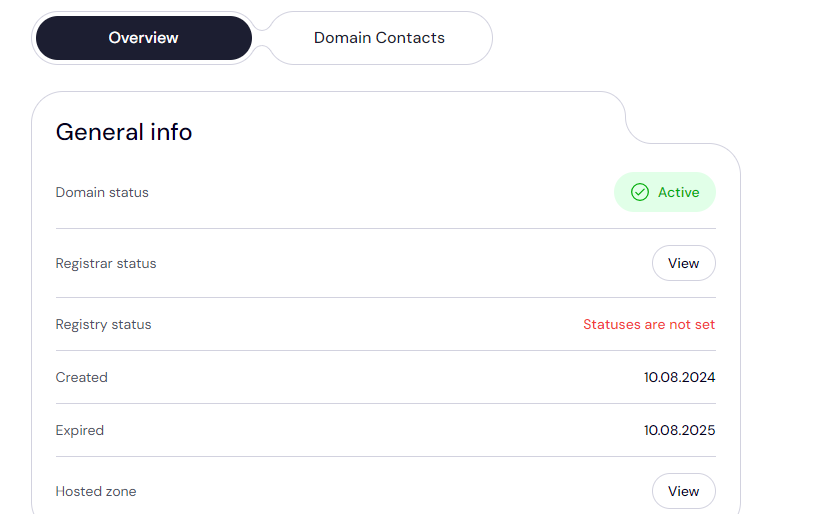
This will open the domain management page, where you can manage your domain settings and contact information.
- Access The Nameserver Settings
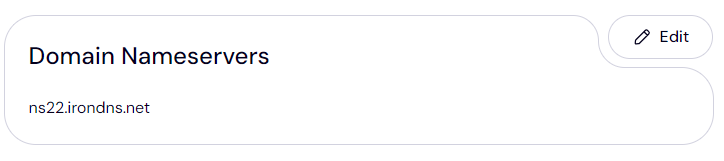
Scroll down to the Domain Nameservers section to view your current nameservers.
If you're pointing a domain registered with another registrar to Trustname, look for options such as Manage Nameservers, Custom Nameservers, or similar.
Click Edit to begin configuring your custom nameservers.
- Enter Custom Nameservers
Enter the nameservers you want to use.
Custom nameservers typically follow this format.
[+] [List] Green Unordered - ns1.yourdomain.com
- ns2.yourdomain.com
Make sure you enter the names exactly as they should appear.
- Update DNS Records
If you're configuring custom nameservers for the first time, you'll also need to create DNS A records.
An A record maps your custom nameserver hostname (for example, ns1.yourdomain.com) to the IP address of the server hosting your DNS.
To create the required A records:
[+] [List] Green Ordered - From the Domains Menu, Select Hosted Zones.
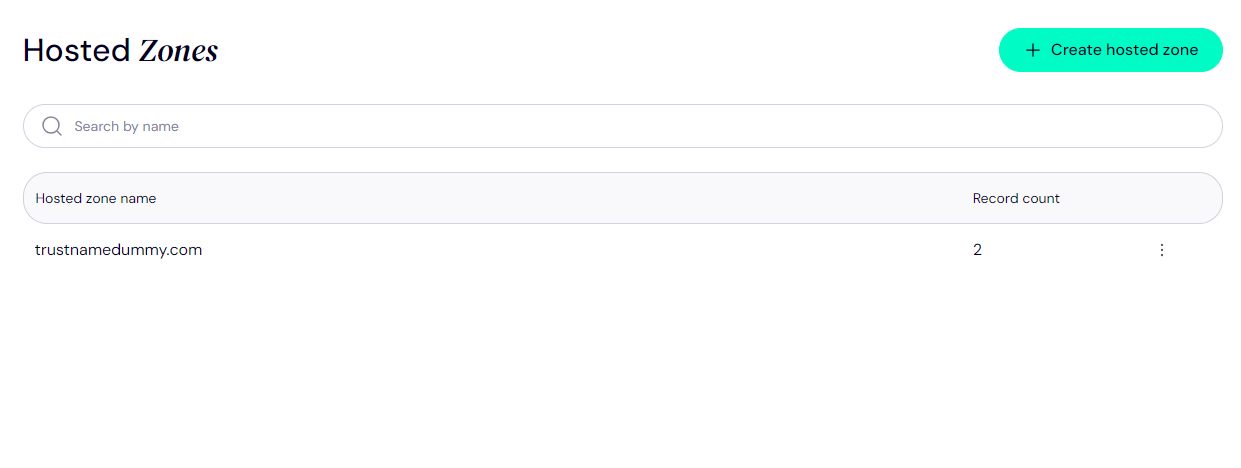
- Open the Hosted Zone for your Domain.
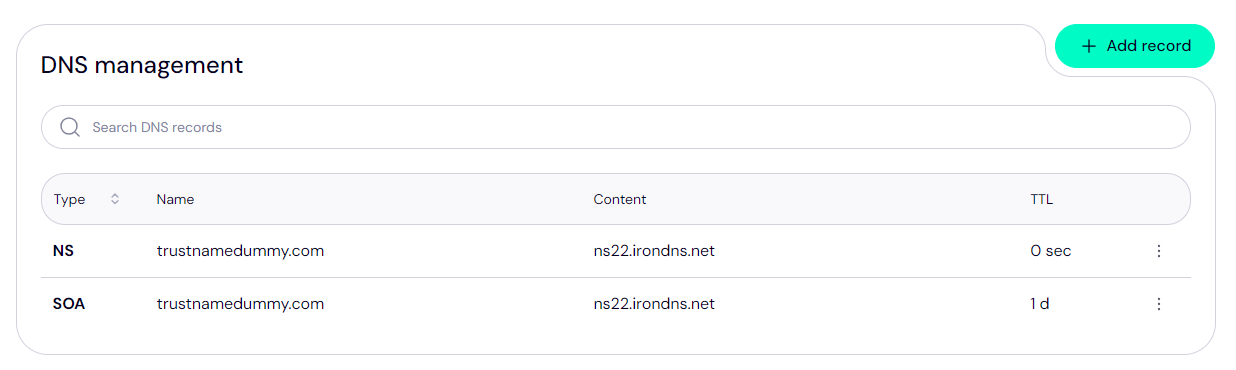
- Click + Add Record in the upper right corner.
- Leave the record type set to A.
- Under Name, enter ns1.
- Under IPv4 Address, enter your server's IP address.
- Repeat the process for ns2.
- Leave the TTL set to Auto, or specify a custom cache time if needed.
- Click Save.
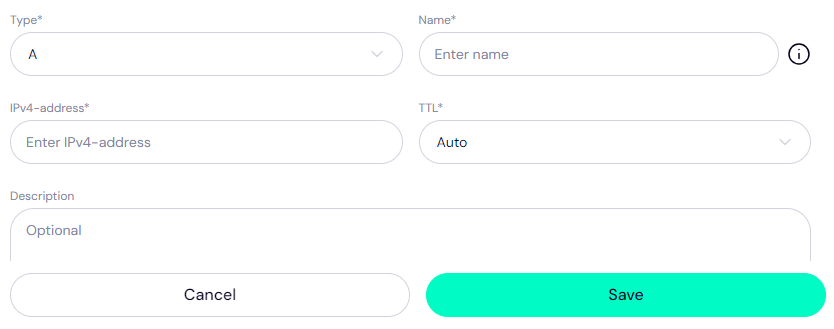
- From the Domains Menu, Select Hosted Zones.
- Save Changes
After entering your custom nameservers and creating the required DNS A records, click on Save to apply your changes.
- Verify Configuration
It may take some time (typically around 24 hours) for the changes you made to be affected. Use a DNS lookup tool to check if your custom nameservers are correctly set up and resolving as expected.
Common Mistakes To Avoid When Setting Up Custom Nameservers
- Incorrect Nameserver Format
Always enter your custom nameservers in the correct format, such as:
[+] [List] Green Unordered - ns1.yourdomain.com
- ns2.yourdomain.com
An incorrect format can prevent DNS resolution.
- Omitting DNS A Records
Custom nameservers require DNS A records that point each nameserver hostname to the correct server IP address.
Without these records, your custom nameservers won't function.
- Not Saving Changes
After entering your nameservers or DNS records, remember to click Save.
Unsaved changes won't be applied.
- Misconfigured IP Addresses
Double check that the IP addresses assigned to your custom nameservers are correct and reachable.
Incorrect IP addresses will prevent your DNS from resolving properly.
- Propagation Delays
DNS updates can take 24 to 48 hours to propagate across the internet.
During this time, your domain may not immediately resolve with the new custom nameservers you've just set up.
Custom nameserver changes typically take 24 to 48 hours to propagate and become fully active worldwide.
Verify that you have correctly entered the nameservers’ names and DNS A records. Ensure that the IP addresses are correct and check if there are any issues with your DNS hosting service.
Yes, you can configure the same custom nameservers for multiple domains, as long as they are properly set up and functional.
If you are using a third party DNS provider, you may not need to configure custom nameservers but would typically use the nameservers provided by the third party DNS provider.
Use DNS lookup tools or services to check the status of your custom nameservers. These tools can verify if your nameservers are resolving correctly.
Was this article helpful?
That’s Great!
Thank you for your feedback
Sorry! We couldn't be helpful
Thank you for your feedback
Feedback sent
We appreciate your effort and will try to fix the article